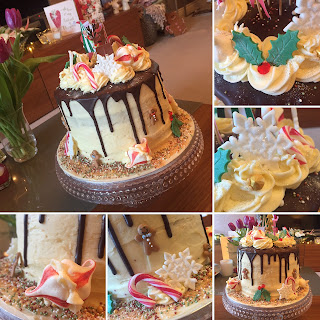
I had seen the drip cake phenomena take over the world of cake and I just had to give it a go!! I created my own version of a Christmas drip cake.
I had a look around and some sort of vanilla and salted caramel mix seemed to be favourite on my list and I found a new recipe to try via the GoodFood website - Chocolate & Caramel Layer Cake
 I hadn't tried a sponge with natural yogurt and ground almonds in the mix before, but reviews were good and so I gave it a try.
The mixture was really easy to make and all cooked evenly and well.
Next to stake and fill the layers...I went for a mix of caramel and salted caramel buttercream for the layers and then opted for the salted caramel flavoured buttercream frosting to encase the cake and form the outer.

I can't lie it got a little messy!
I did a crumb layer, then topped with fresh buttercream including going around the cake board to extend the design.
Whilst still soft, I scattered the base section with red, white and green sugar balls and some gold sugar - I should add, I was creating as I worked rather than having an exact plan but it seemed to work out pretty well.
 This was all complete and then I left the cake overnight before starting the drips, decoration and finishing elements.
I had pre-made icing shapes, mini meringues and got some mini candy canes...the red, white and green with hints of gold was really the 'theme' colours.
* * *
Day 2 - I made the dark chocolate ganache glaze to create the drip...
It was basically dark chocolate and unsalted butter, which gave it a great gloss and consistency.

I heated the chocolate in a glass bowl over a pan of boiling water and added the butter when melted, then when everything was combined I kept stirring until it was a nice glossy, smooth texture. I was nervous so kept stirring off the heat for a few mintues, I guess slightly cooling the mixture before the make or break test - Would it drip like you see in all the pictures?!
#toptip was to put the cake in the fridge to super cool the buttercream to avoid pouring hot chocolate on a cake and just melting it!

So I got a teaspoon...took the cake out of the fridge and took the plunge and spooned on the chocolate mixture. I tested how it seemed to react, working the mixture from the centre towards the edges - pushing a bit of mixture over and seeing how far it dripped...it looked to be working well so I continued to turn the cake and drip the chocolate over the edge until it was complete.
I was pretty pleased I had got this far, so everything else was a bonus and somehow it just developed from this point on.
I wanted to create a little bit of height but all the decorations I had were smaller so I piped extra buttercream around the crown of the cake, leaving the middle for some cute cupcake toppers I had in the cupboard. I could then use the buttercream as a cushion for the snowflakes, candy canes and holly and as you can see it just built up from there.
I was really pleased with how it looked...but how would it taste?!
Great news, eveyone enjoyed it! Having 4 layers it is a challenge to eat a complete slice, but you have to give it your best go!
* * *
I can't wait to try this with new flavours and colours over the spring/summer months so watch this space...


CONVERSATION